
Welcome to visit ADA MED SUPPLY LIMITED
Phone:+86 13383897707
Email:ada-manikin@adaanatomy.com
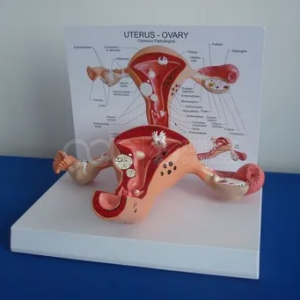
Students learn normal pelvic anatomy quickly and abnormal anatomy slowly, because abnormality is a variation on a shape they have only seen once. The BIX-A742 is a mounted pathological uterine model: a uterus with adnexa, painted to show pathology variants, with a printed reference chart beside it. Its teaching value is not the number of lesions it shows but the comparison it forces — normal on one side of the bench, abnormal on the other.
| Item | Detail |
|---|---|
| Model | BIX-A742 |
| Type | Pathological uterine model |
| Structures | Uterus, cervix, fallopian tubes and ovaries on a display mount |
| Marking | Painted pathology variants with a printed reference chart |
| Mount | Removable from the base for handling |
| Dimensions | Not published on the product page — confirm with the supplier |
| Price | Quoted per order |
| Certification | ISO documentation on request |
A normal uterus model teaches orientation: fundus, body, cervix, tubes, ovaries, and the relation of the organ to the bladder and rectum. A pathological model teaches discrimination: what changes when the tissue is no longer normal.
That discrimination is the clinical skill. In a lecture, pathology is a list; on a model, it is a visible difference in contour, colour and proportion. Reviews of anatomy teaching argue that models should be chosen for the specific spatial or discriminative task they support, not as generic illustration [1]. Physical models also outperform 3D displays and textbooks for learning spatial relationships [2], which is exactly the skill a student needs when comparing a normal and an abnormal uterus.
Use the two models together. Put the normal model at one end of the bench and the pathological model at the other, then ask the student to describe the difference before naming it. Description first, diagnosis second.
0–5 minutes: normal reference. Students identify fundus, body, isthmus, cervix, tubes and ovaries on a normal model or chart.
5–15 minutes: guided observation. With the A742, students describe what has changed in contour, colour and surface. The printed chart is the answer key, not the starting point.
15–25 minutes: naming and linking. Students match their descriptions to the terms on the chart, then explain which structure is affected and why it matters clinically.
25–30 minutes: limits. Discuss what the model cannot show: tissue texture, mobility, symptoms and imaging appearance.
Q1. Which pathologies are shown on the model? The model carries painted pathology variants and a printed chart. Ask the supplier for the current variant list, since it may change between production runs.
Q2. Is the model life-size? The product page does not state a scale. Confirm dimensions with the supplier before ordering.
Q3. What is the price and minimum order? Price is quoted per order. Email ada-manikin@adaanatomy.com with quantity and destination for a current quotation.
Q4. Can it be removed from the stand? Yes, the model is mounted for display and can be lifted for closer handling.
Q5. How should it be cleaned? Use a soft damp cloth and a mild detergent; avoid solvents that could lift the paint. Confirm the cleaning method with the supplier.
Q6. What after-sales support is available? Warranty and spare-chart availability should be confirmed in writing with the quotation.
For the pathology variant list, dimensions or a quotation: ada-manikin@adaanatomy.com. Production follows ISO 45001 management practice; CE documentation is available for EU procurement.






Leave a comment: